Top 10 video and audio editing hacks you need to know
As a content creator, having a few hacks up your sleeve to make your editing process quicker and easier – is priceless. Here's 10 new hacks for both audio and video editing. In collaboration with Adobe Stock and Epidemic Sound.

As a content creator, having a few hacks up your sleeve to make your editing process quicker and easier – is priceless. Give this blog post a read if you want to learn Lizzie Peirce's 10 best hacks for audio and video editing. In collaboration with Adobe Stock and Epidemic Sound.
If you’re reading this blog post, there’s a good chance you’re a content creator and video editor. And if you are, there’s a good chance you’re spending a lot of time in Premiere Pro. The hacks I will be talking about today will truly speed up your workflow and make your life easier. Let’s do it!
Tip #1: Add keyframes for audio in Premiere Pro
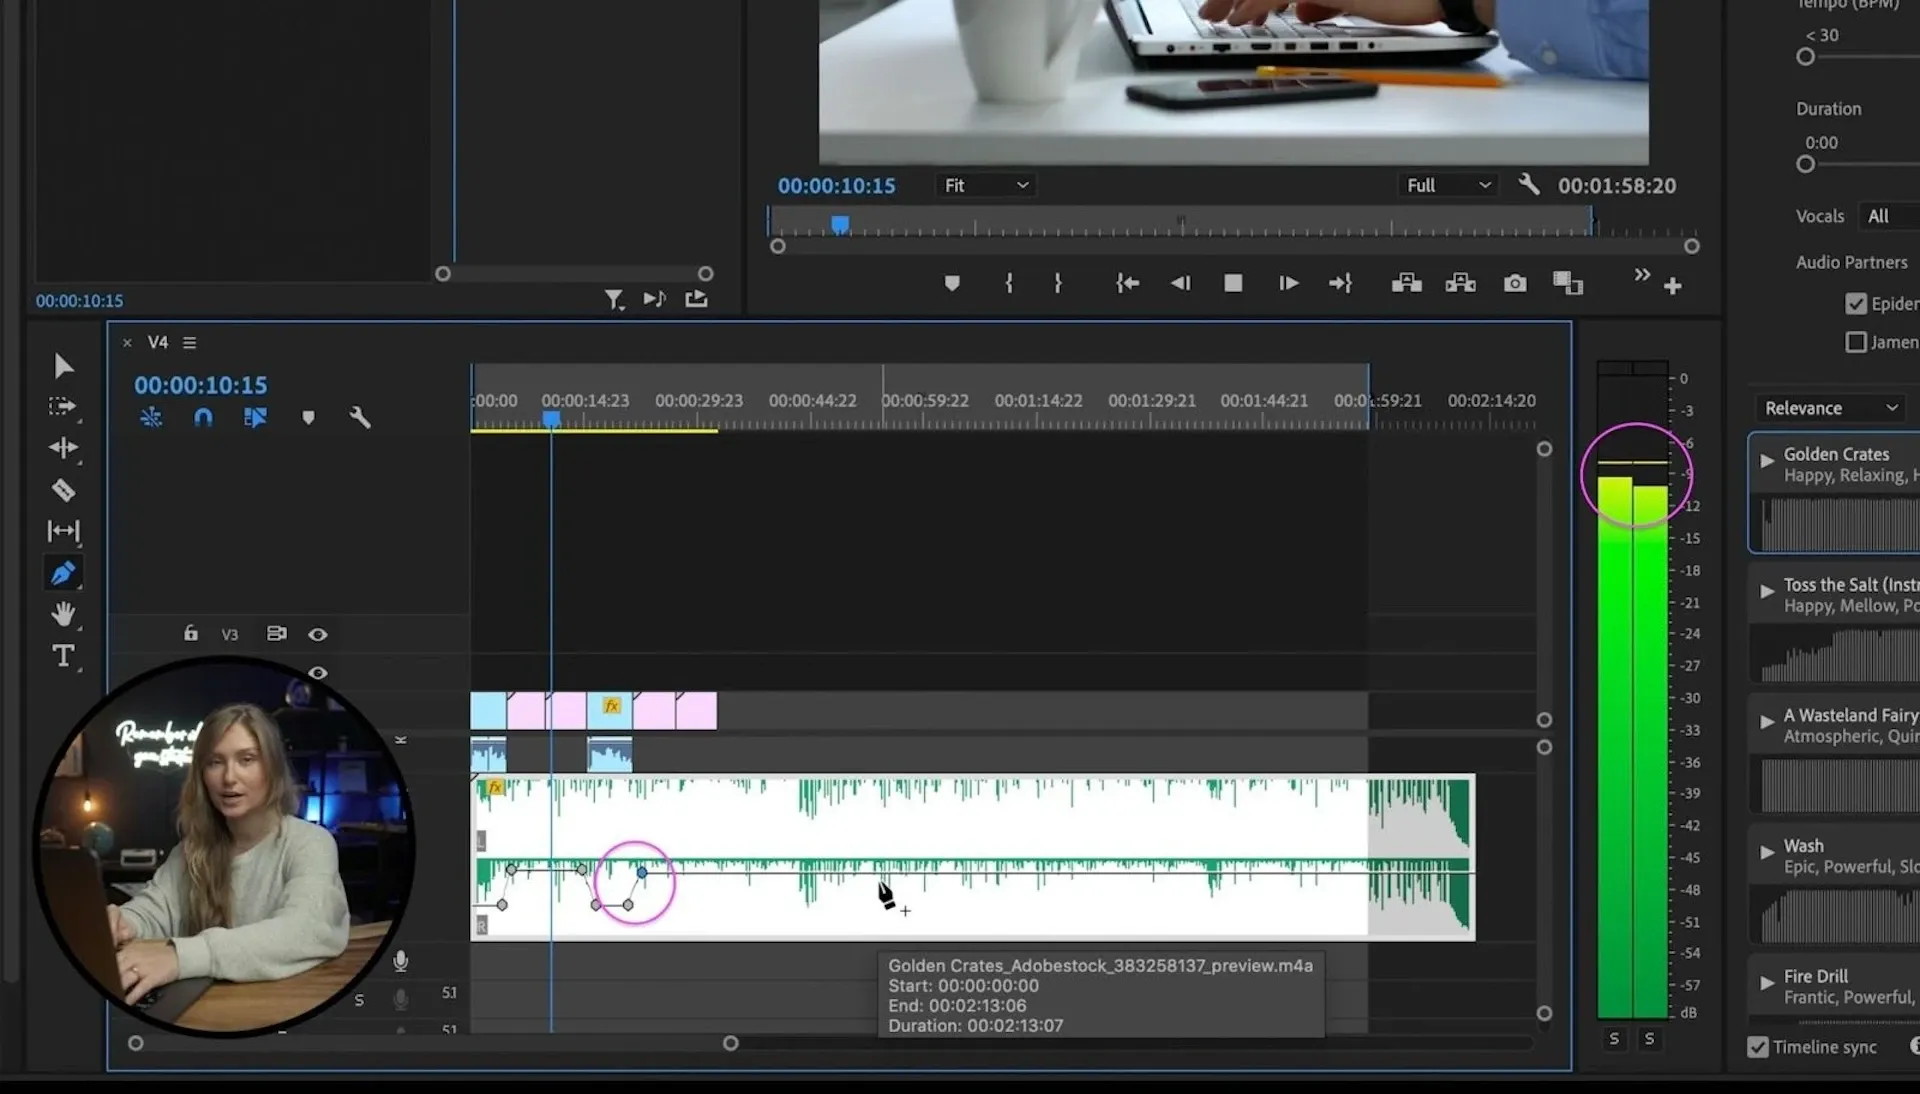
When you’re editing videos that cut between talking and B-roll, you’re going to want to use this tip. First off: choose a track or sound effect that you like from Epidemic Sound and drag it into your timeline. Add keyframes by selecting the pen tool or pressing P on your keyboard. After that, click to create points on your soundtrack where you want to lower or raise the audio. Personally, I usually lower it during my talking bits and bring it back up for B-roll.
You always want to make sure your audio isn’t peaking, but you also want to make sure your audio isn’t too low. To do that, check your audiometer to the right. And again, use keyframes to adjust your audio so that even when you’re yelling or whispering – your audio is always level.
Tip #2: Premiere Pro video effects
Video editors often have their own library of favorite effects that they like to use. These effects often represent the editor’s specific style. So if you want to make your life a lot easier: make a ‘Favorites’ folder in Premiere Pro to keep track of all those effects. This will save you precious time searching and sorting.
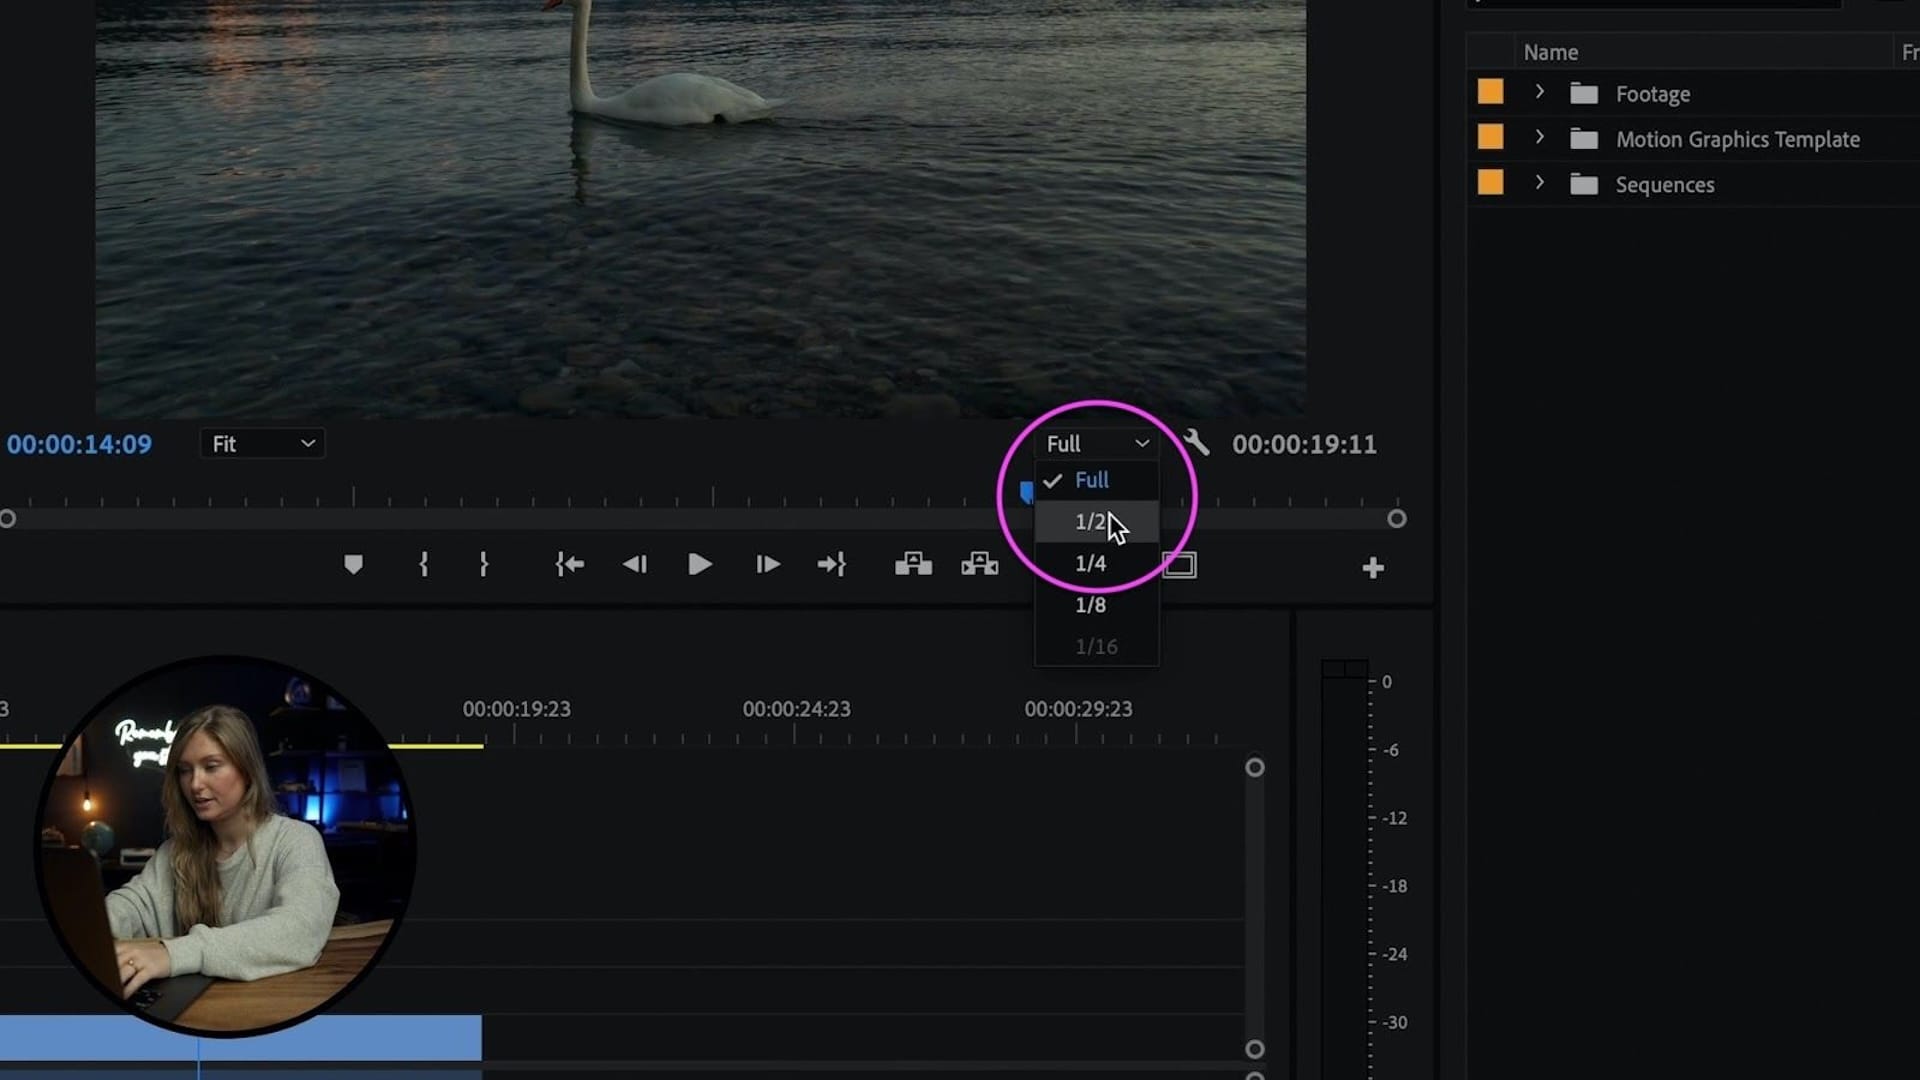
Tip #3: Playback resolution Premiere Pro
Not all of us have the luxury of working on a computer that plays back 4k footage without a stutter. So, if your computer is lagging – try to turn down the playback resolution. All you have to do is click the playback box below the video to the right and set the playback resolution to ½ or ¼. Doing this doesn’t change the video’s actual quality but rather allows the program to playback the previews without using full resolution.
Tip #4: Use proxies in Premiere Pro
If you want another way to speed up playback when working with high-resolution footage – use proxies. Now, what is a proxy? You might ask. Well, a proxy is a low-resolution file that holds the place of the original high-resolution file. It sounds complicated, but I promise you, it’s not. Here’s how it works.
Right-click the clip from the project X and click ‘Proxy,’ ‘Create Proxy,’ and then choose a file format and a location to save the proxies. Now, Adobe Media Encoder will be launched to render your files into easy to edit proxy files.
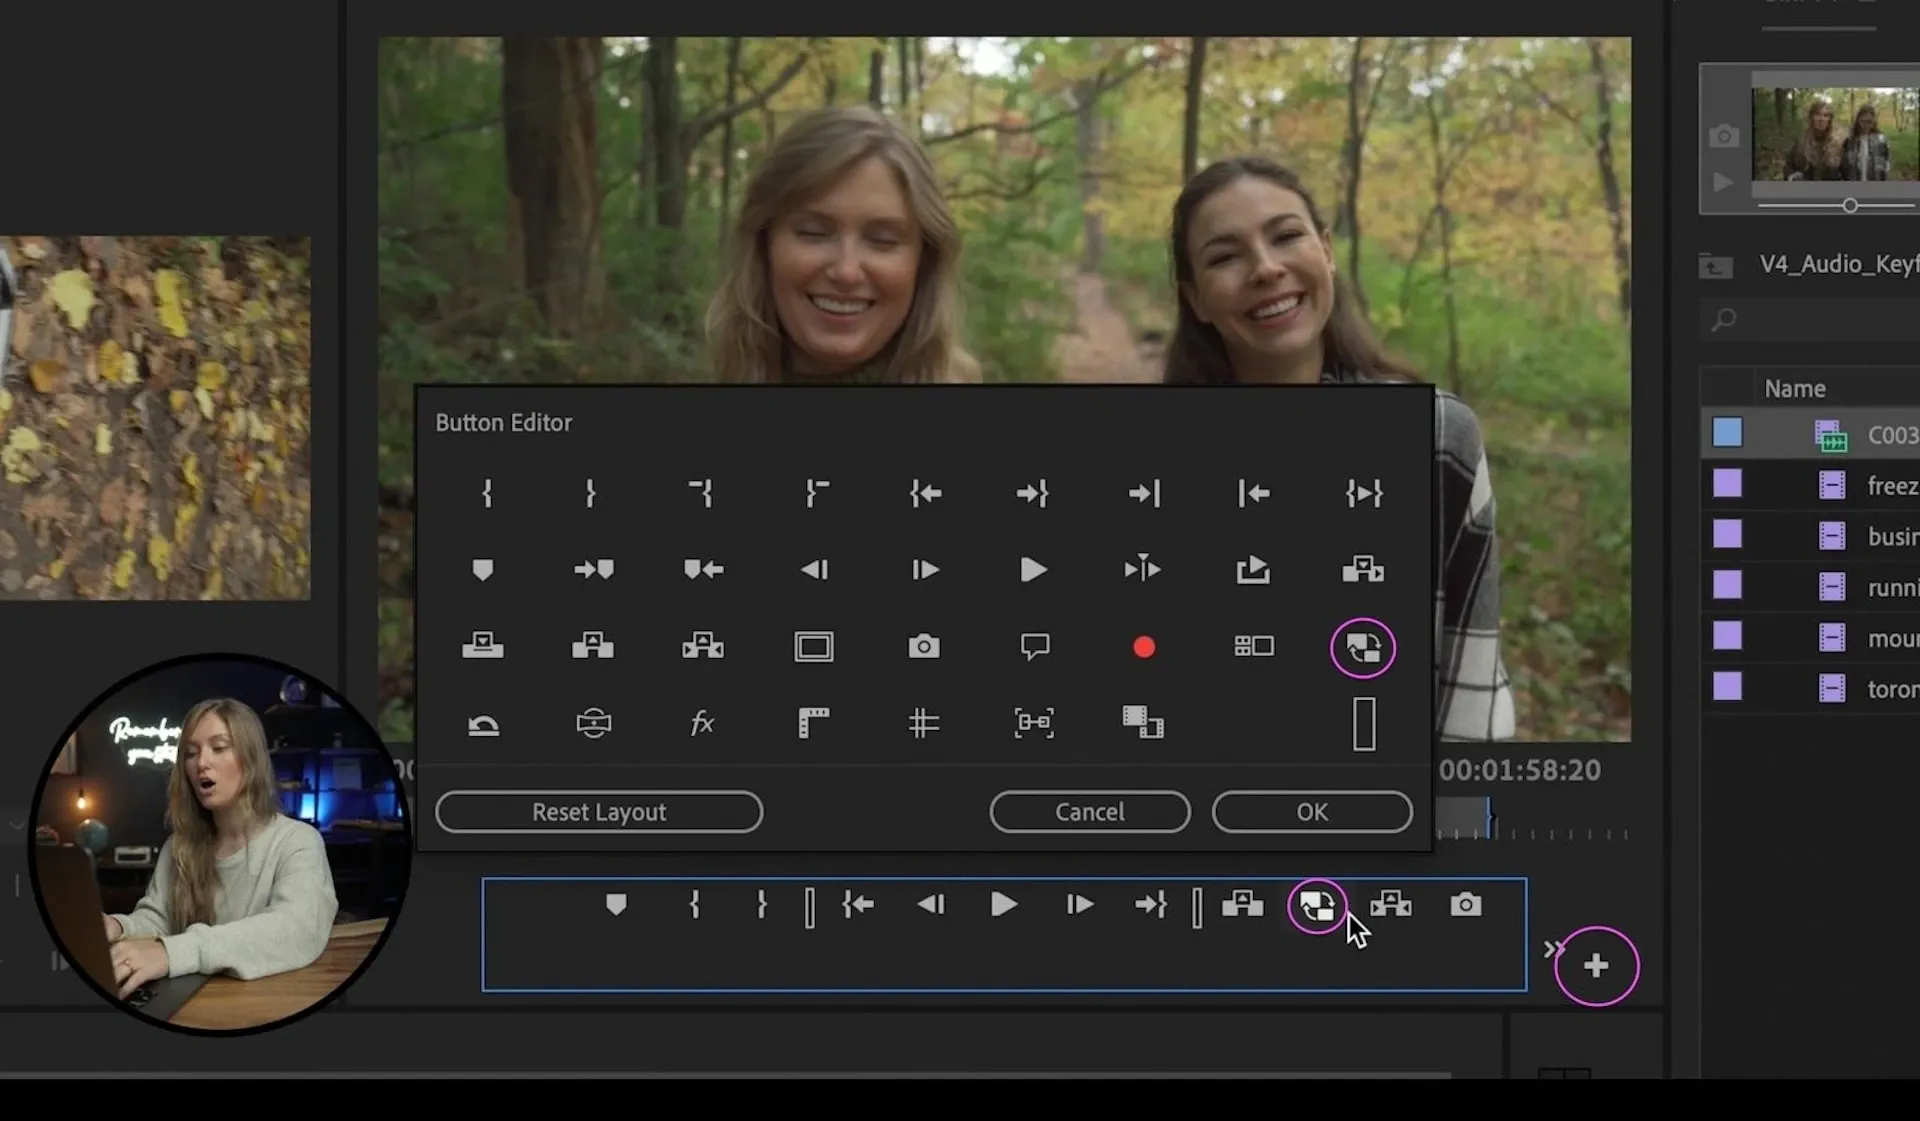
Now you need to add a button to turn the proxies on and off. So, under the video preview, you’ll see the program monitor tool button. Click the button editor and drag the toggle proxies button on the toolbar, and then quit the button editor. From now on, you’ll see that proxy button turn blue when you press it, and by re-pressing it, you can use the original media.
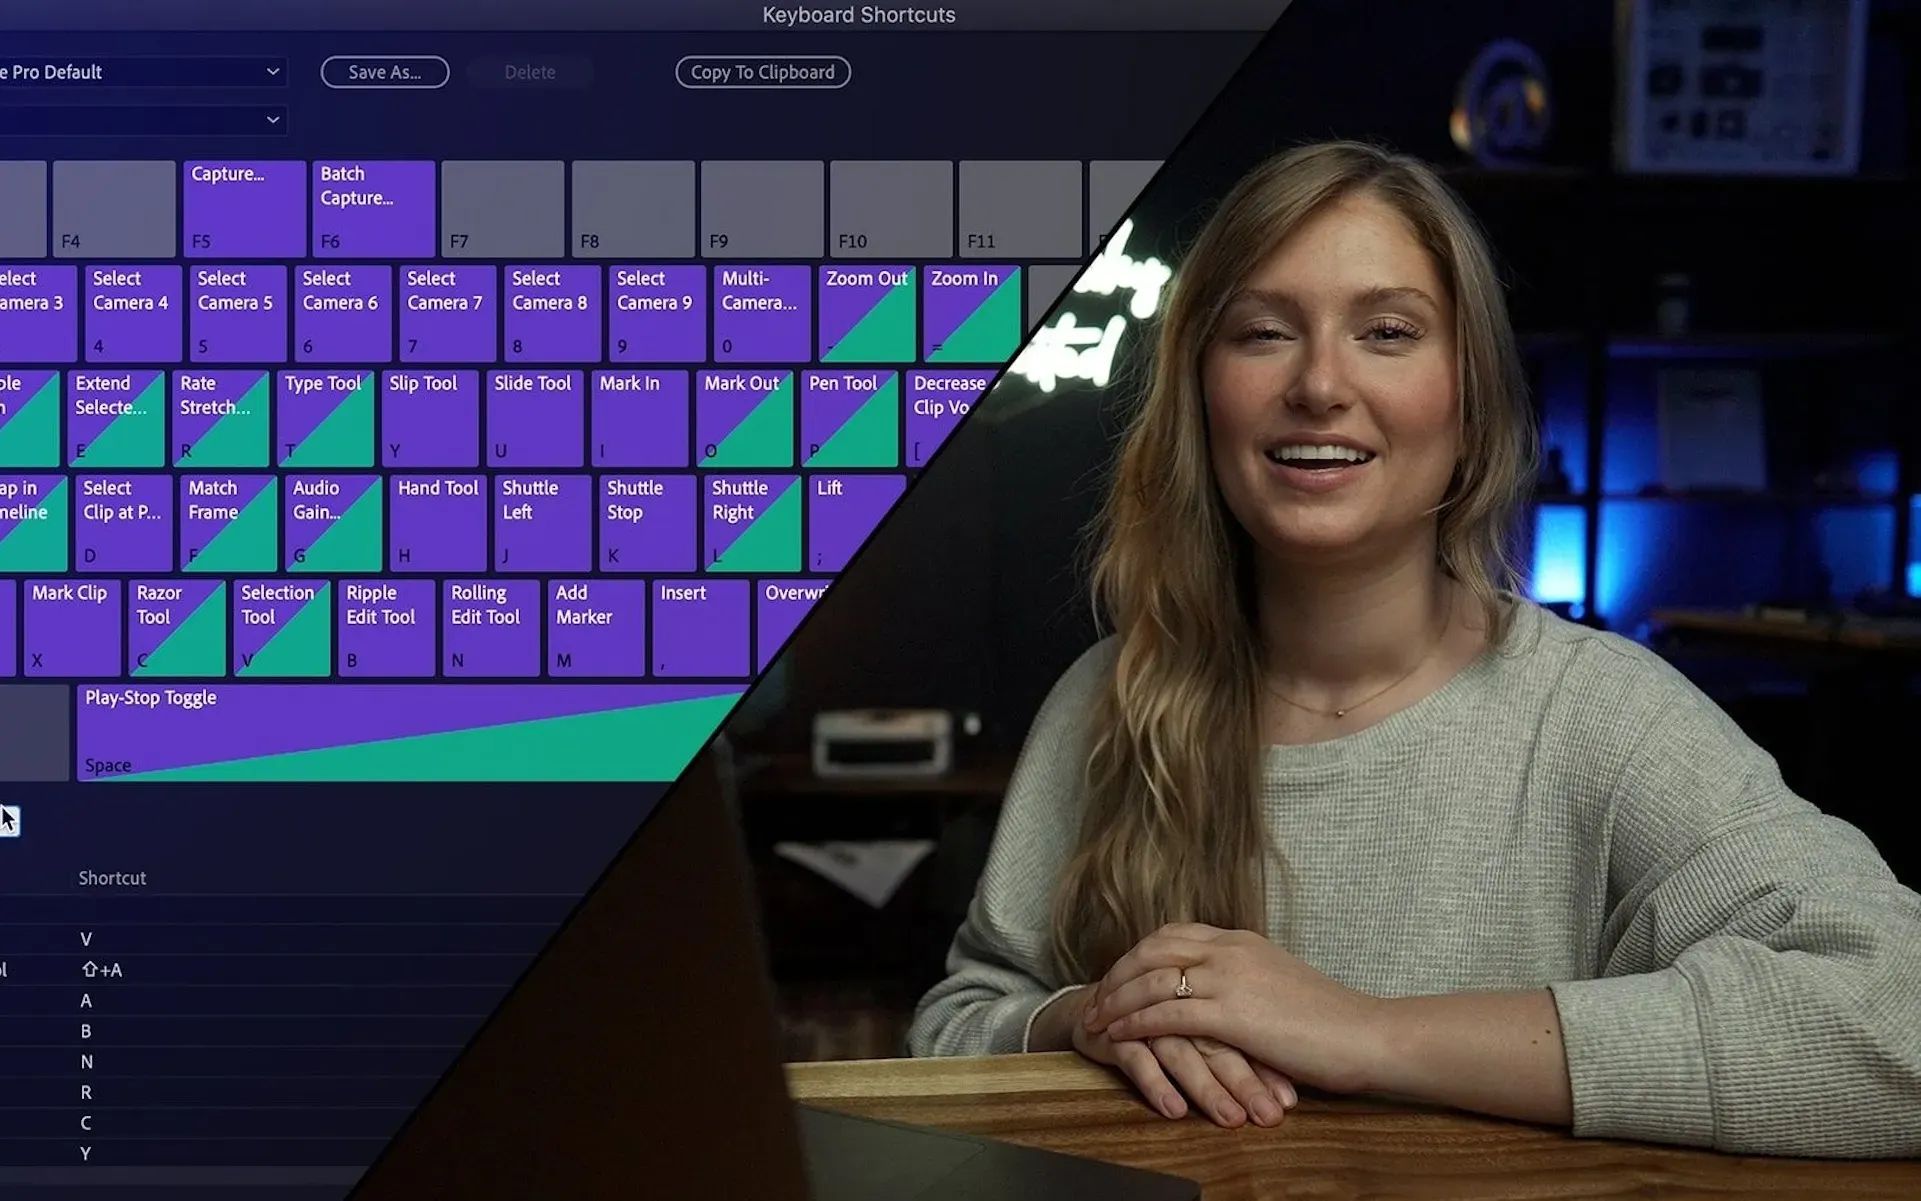
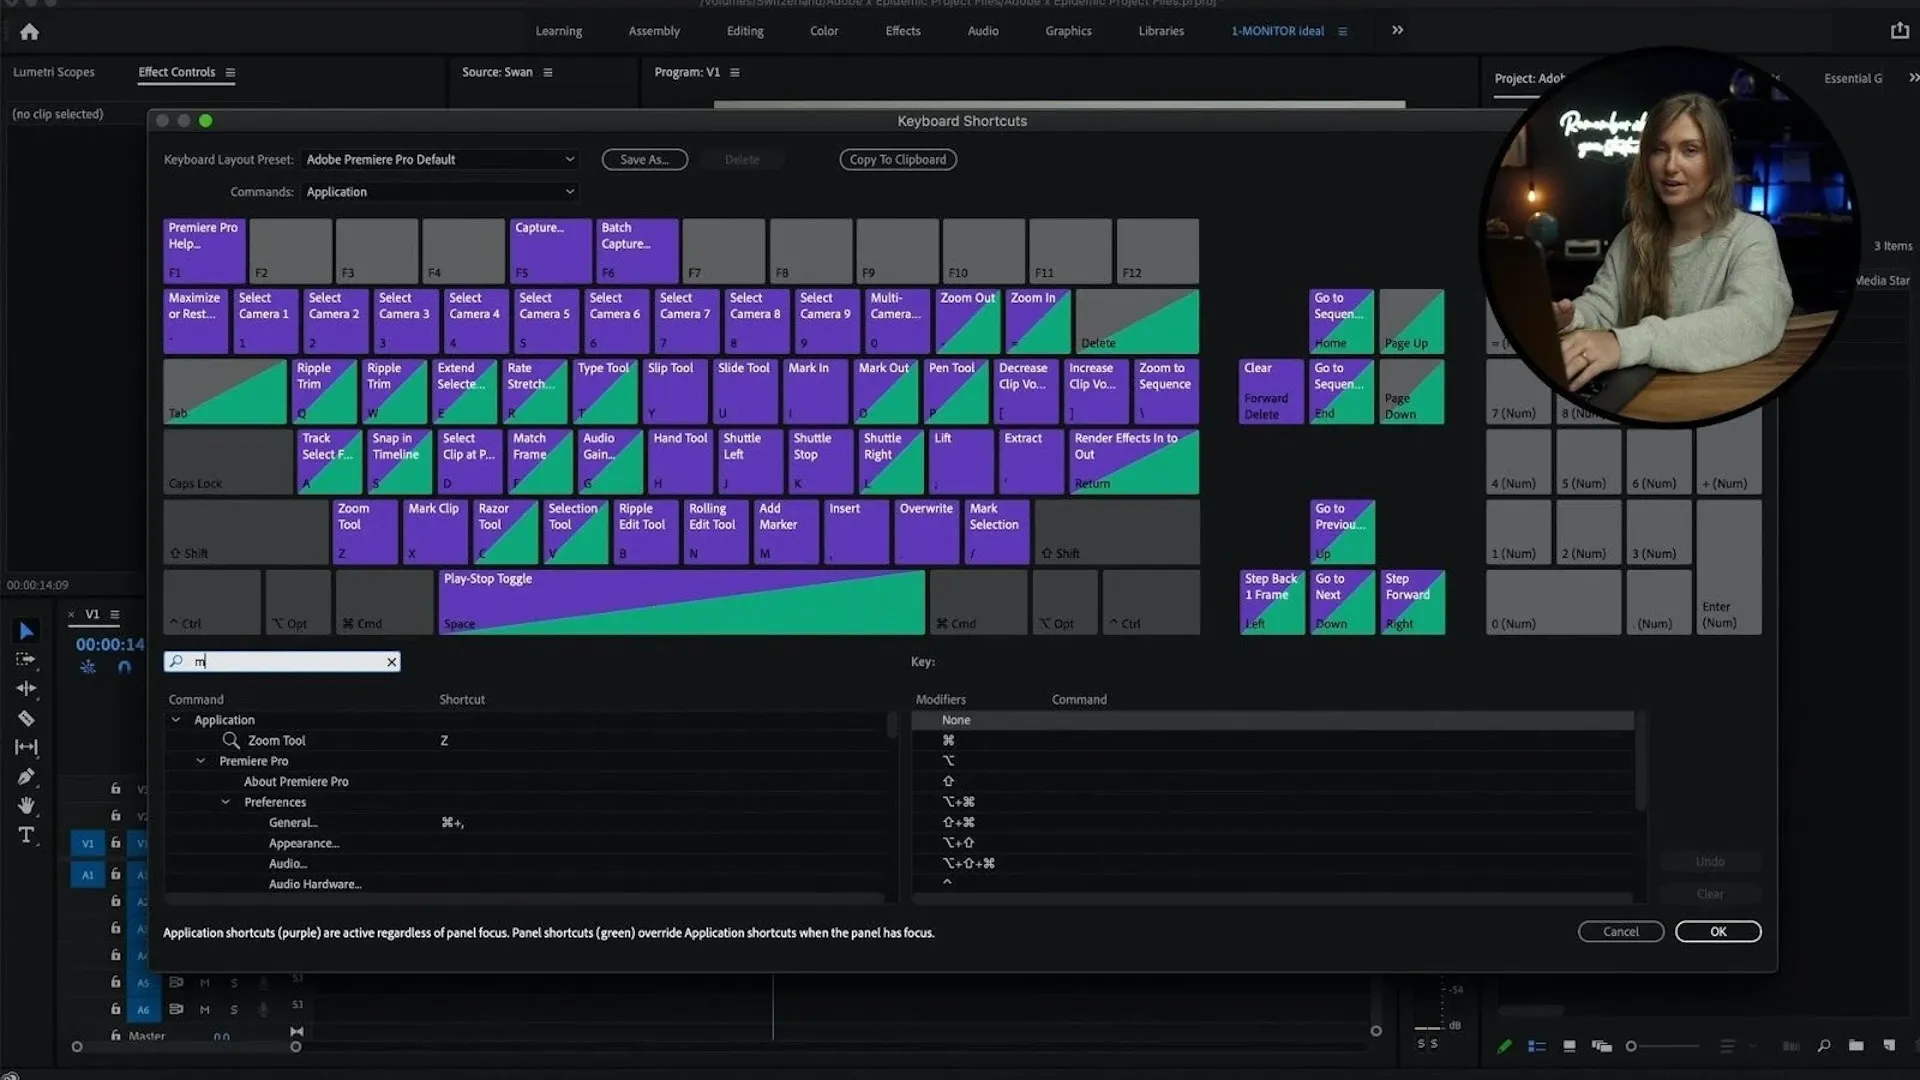
Tip #5: Use shortcuts
Shortcuts are also known as lifesavers. I like to customize my keyboard so that my most frequently used buttons are exactly where my hands rest. To do this, click ‘Premiere Pro,’ ‘Keyboard Shortcuts,’ and then change them around to fit your preferences. Some of my favorites are M for ‘Marker,’ C for ‘Razor,’ and ‘Add Edit’ is my favorite, so I’ve customized it to S.
Tip #6: Record audio directly to timeline
Did you know you can use voiceovers and record audio directly to your timeline by using an external microphone? Yup, you heard that right – you can record audio directly into your timeline. That means you can make sure your audio winds up perfectly with the footage you’d like to use over it. This will also save you time uploading and importing. I’m a sucker for a good voiceover, and that’s why I love this hack so much.
Tip #7: Audio transitions Premiere Pro
Ask any content creator: audio is just as important as the visuals when it comes to a good viewing experience. Choppy audio can really disrupt the flow of a video. That’s why it’s extremely important to use audio transitions. My personal favorite is ‘Fade in’ and ‘Fade out.’ This can be done very simply by right-clicking by the end of a clip and selecting ‘Apply Default Transitions.’
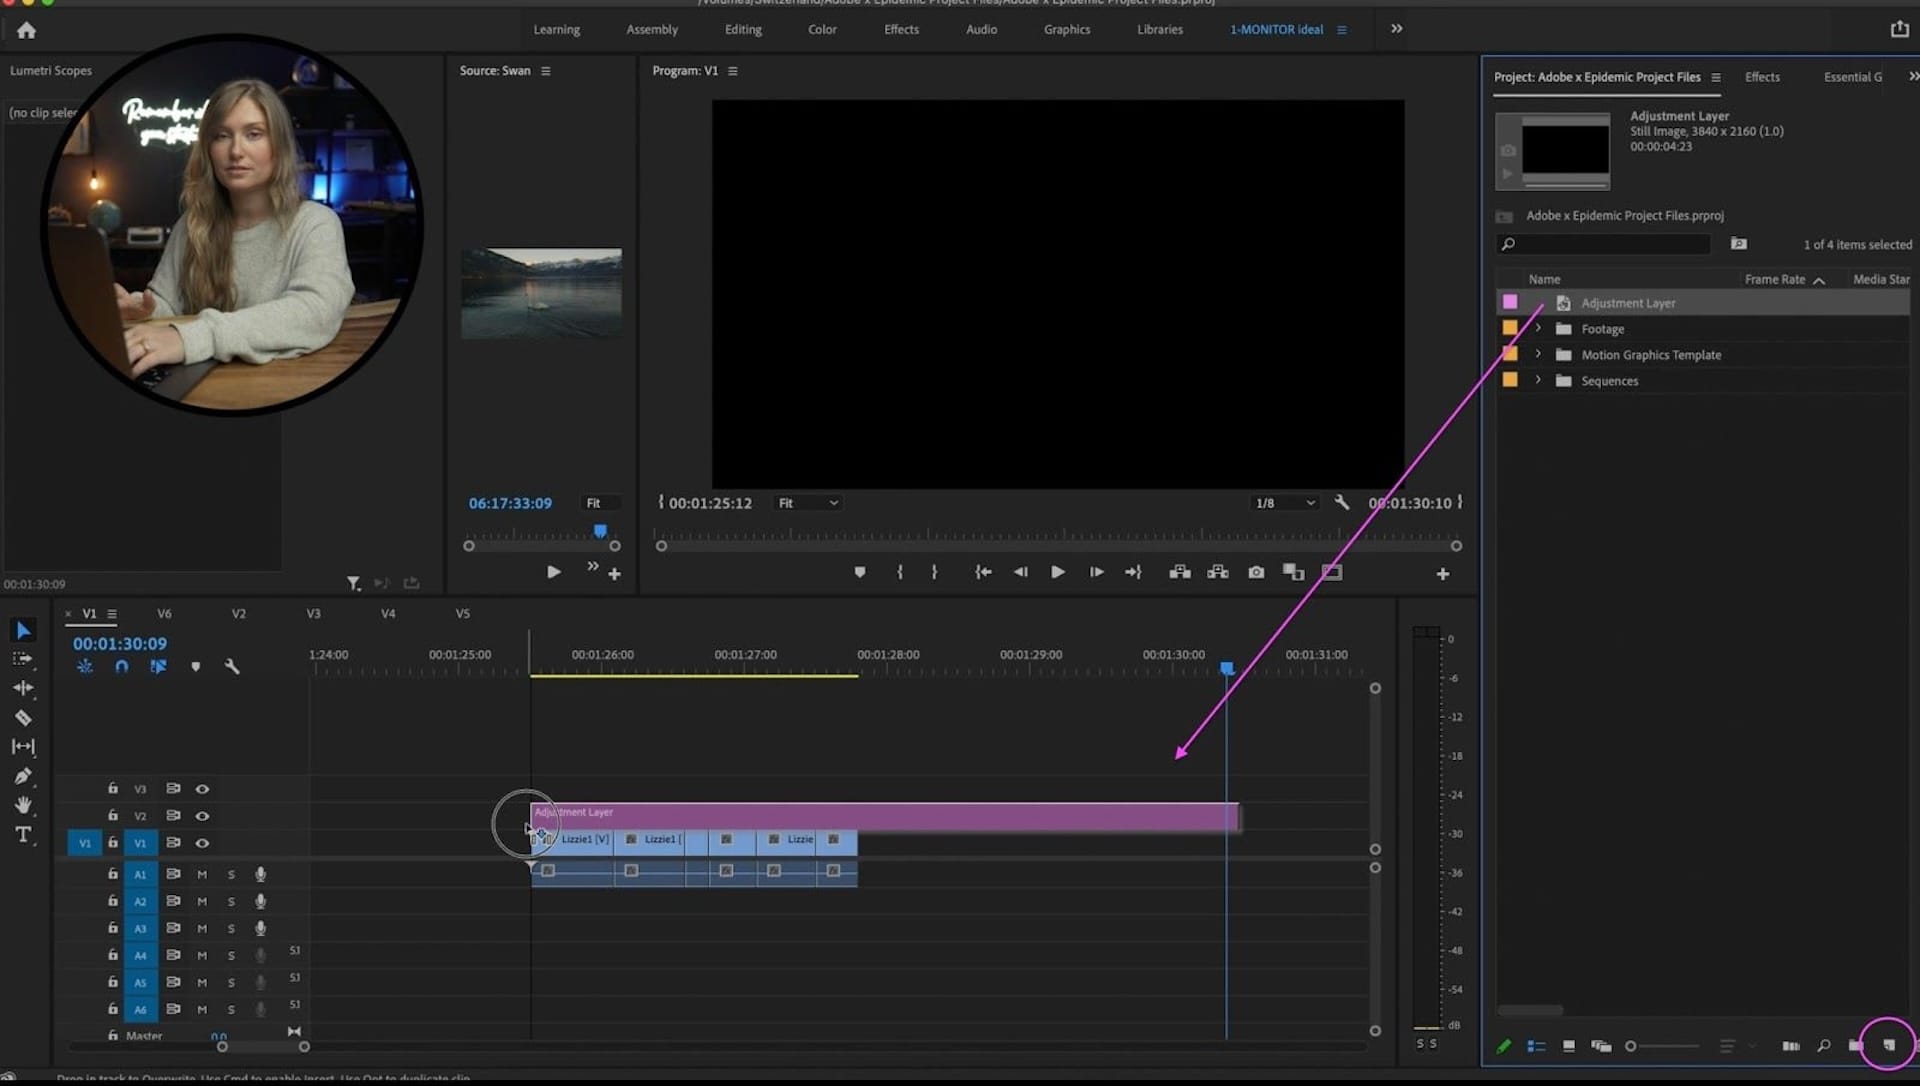
Tip #8: Adjustment layers Premiere Pro
Try to think of adjustment layers as a safety net for your work. They’re useful for adding effects and color grading to a bunch of clips at once, and they’re even more useful when removing them. To add an adjustment layer, first, make sure you’re selected on the project window, then head up into the menu and click ‘Add Adjustment Layer.’ It will then appear in your project window, and as you drag it onto the timeline, it looks like a video clip in itself (which it sort of is; it’s a blanc video clip).
I like to use adjustment layers for color edits: one for color correction and one for color grading. The great thing about adjustment layers is that you can drag it across all your clips and add all the same effects to them. This definitely beats having to copy attributes over and over again! The reason I say it’s a safety net is because if you change your mind or if you want to adjust an effect, you only need to adjust that specific adjustment layer. You don’t need to go in and adjust every single clip.
Tip #9: Use markers
You make these with one click on a keyboard, and it saves you a ton of time scrubbing. I like to use markers to mark my audio: I listen to the beat of my Epidemic Sound track and put a marker in for every beat where I think it should be a cut. This makes the footage look cohesive. Once again, I like to use one of my favorite shortcuts – M – to simply add a marker.
Tip #10: Export in media encoder
Tip number ten is to edit while you export using Adobe Media Encoder. Waiting for a project to export so that you can work on your next project is not fun. But you don’t have to export directly from Premiere Pro – you can use Media Encoder to export your projects so that Premiere Pro is free for you to use to edit your next project. Pretty great, right?
To do this, all you have to do is go up to ‘File,’ ‘Export,’ and ‘Media.’ Choose your settings for the export, and instead of selecting ‘Export,’ press queue. This will automatically launch the media encoder. Once the file’s loaded in Media Encoder, just press the green button, and it will start to export. And yes, you can still work on other project files in Premiere Pro while this is happening in the background.
I hope these tips will speed up your workflow and make your life easier so that you can create even more great content!
Creator's Lab is an educational series co-produced by Adobe Stock and Epidemic Sound, aiming to provide tips and tricks to storytellers to bring their video content to the next level.
Lizzie Peirce is an Epidemic Sound ambassador and pro-content creator from Toronto. Lizzie is also running a production company together with her fiancé Chris Hau, who is a successful content creator as well.

Are you a video editor or filmmaker? Whether you’re an absolute master or just a beginner, discover what Epidemic Sound has to offer on our Epidemic Sound for Filmmaking page. Oh, and if you’re looking for some background music for your videos, we got you covered.
Related posts: