How to use Adobe Audition: A beginner’s tutorial
There are so many programs for recording and editing sound, which makes it tough to know where to start. One of the more popular choices is Adobe Audition. Today, we’ll cover all the basics in this beginner’s tutorial.

There are so many programs for recording and editing sound, which makes it tough to know where to start. One of the more popular choices is Adobe Audition. Today, we’ll cover all the basics in this beginner’s tutorial.
What is Adobe Audition used for?
Adobe Audition is used for editing and mixing audio. It’s a digital audio workstation (DAW) included in your Creative Cloud membership – head over here for a seven-day free trial if you’re not signed up already.
Do professionals use Adobe Audition?
Absolutely. Filmmaker, actor and composer Jim Cummings used Audition to edit audio for his feature film, The Beta Test. Doing so saved him time during the sound editing and mixing phases, as he didn’t have to keep switching between Adobe Premiere Pro – where he worked on the film’s visual assets – and another DAW, like Pro Tools.
Keeping inside Adobe’s walls offers a fluid workflow you just don’t get when flitting between different programs. Christine Steele, an Emmy-winning documentary filmmaker, swears by using Adobe Audition alongside Premiere Pro. Not only does she edit within the program, but she also uses it to handle voice recording. Check out what she has to say below.
Is Adobe Audition hard to use?
Adobe Audition for beginners is 100% a thing. You can do it, it’s not impossible, and it’ll be so rewarding once you nail it. However, Audition might seem a little daunting if you’ve never used a DAW. It looks stylish, but the in-depth menus and extras are a lot to take in at once – after all, professionals use it. Once you master the basic functions, though, you can make your Audition experience as simple or complicated as you please.
How to use Adobe Audition for editing
So, you know why people use Audition. Let’s dig into how. Keep reading for a full Adobe Audition tutorial for beginners.
Getting started by recording in Adobe Audition
Let’s start by recording in Adobe Audition. Once you open the program, you’ll see the ‘Waveform’ view. This is the single-track workview, which you’d use if you’re just working with one piece of audio.
It’s worth remembering that the Waveform view is a ‘destructive working area.’ This means any changes you make to the audio are permanent, unless you remember to throw in a tactical ‘CTRL Z’ and undo your previous step.
Start your recording by hitting ‘File,’ ‘New’ and ‘Audio File’ up top. Name your file something memorable and set ‘Sample Rate’ to 44,100 Hz. This is the standard sample rate for audio recordings; you’d go even higher if you were dealing with high-fidelity music files. Anything lower than 44,100 might cause your audio quality to degrade.

‘Channels’ depends on what you’re recording. Mono is good for voice-only material like podcasts, while stereo is a fuller option most people would use when recording music. Leave ‘Bit Depth’ on the default setting of ‘32 (float)’ – this is the most versatile bit depth, allowing more leeway when you edit your audio later.
Hit ‘OK,’ then you’ll see some buttons at the bottom. You should be familiar with the tape deck-style symbols like ‘Play,’ ‘Stop,’ ‘Rewind’ and so on. Click the red ‘Record’ button and then click ‘Stop’ when you’re done!
Recording in Adobe Audition: setting up your audio interface
Your audio interface – what you use to record and replay your audio – might be recognized and set up automatically. However, sometimes you have to do that manually. Here’s how.
1. Head to ‘Adobe Audition CC’ at the top menu, then hit ‘Preferences’ and ‘Audio Hardware.’
2. Check that your input and output devices are correct. You can do this by clicking ‘Audio Channel Mapping,’ which should display where your audio goes in to be recorded, then where it goes out to be played back.
Editing in Adobe Audition for Beginners
Once you’ve recorded, you’ll need to know how to manipulate the audio.
- Zoom in and analyze. Hover the mouse over the time bar, then scroll to zoom in and out. If you want to analyze a piece of audio, click and drag over it, so it’s highlighted – there’s a ‘Loop Playback’ button near the bottom, which repeats your highlighted section over and over. Just remember to turn it off when you’re done, as it can get a bit annoying.
- Delete your selected footage if you don’t like it, or edit it. One of the most common problems is that the audio might be too loud or quiet. For recording voices, you want around -6DB to -3DB. If your recording is above or below that, you can use the ‘Volume Heads Up’ display: a little box that sits above your Waveform view. Hit ‘Adjust Amplitude,’ then simply click and drag to make your changes.
How to use Adobe Audition for Multitrack editing
We’ve learned about the Waveform view, but let’s discuss Audition’s ‘Multitrack’ workplace. This is a space where you can edit and mix unlimited audio tracks – you could create an entire solo symphony, if you wanted.
The Multitrack workspace is non-destructive. This means any edits, cuts or effects you slap onto your audio won’t affect the source files. To get started, go to ‘File,’ ‘New’ and ‘Multitrack Session.’ Fill in the same settings as you did for the Waveform project for things like ‘Sample Rate’ and ‘Bit Depth,’ and keep it in stereo unless you’re specifically working on a mono project. Finally, click ‘OK’ and your Multitrack project’s ready to work on!
Multitrack view does what it says on the can: it’s multiple tracks on top of one another, working together to create one larger file. This is how most podcasts, radio shows and pieces of music are assembled. Each different aspect is recorded individually, added to a Multitrack project, then mixed down into a stereo Waveform file.

You can load and drag prerecorded audio content from the ‘Files’ panel on the left-hand side of your project. Use this, alongside the ‘Media Browser’ section next to it, to search your computer and find exactly what you need.
Once you have your track, you can drag and drop it directly onto the Multitrack project timeline. You can crop your audio clip just like you would on an image or video editing timeline, pulling the sides to the stop and start points you require.
If you want to toy with your audio some more, don’t worry. Most of Adobe Audition’s effects are stored in the handily titled ‘Effects Rack,’ which sits on the left-hand side of the screen.
How to use Adobe Audition for effects
You could spend weeks exploring all the different tricks and effects hidden within Audition. Let’s look at some of the essentials, and remember: you can add up to 16 effects to each audio track in your project.
- Equalizer: Enhances and removes certain frequencies to balance your sound, pushing louder parts down and honing in on quieter sections. Learn more about equalizing with high-pass and low-pass filters here.
- Fade In & Out: There should be two little triangles in the top corners of your audio. Pull these triangles down onto the Waveform to determine the exact points to start or end on a fade.
- Envelope Points: These are marked by a yellow line across your audio. If things get too loud, drag the yellow line down accordingly, and the volume will decrease with it.
- Panning: This can be accessed in the blue line underneath the yellow Envelope line. Playing around with this pans your audio from left to right in the listener’s speakers or headset.
- Spectral Frequency Display: Magic might not exist, but this is the next best thing. It’s a little box next to the ‘Multitrack’ menu, showing a heat map of sound frequencies. If undesired noise – wind, background chatter, a very happy dog – has crept into your recording, you can use this to identify and delete it.
- Declipper: For distorted audio that pushes the levels and is just too loud, you’ll need a declipper. To do this, copy your offending audio into a new project, go to ‘Window,’ ‘Diagnostics,’ then ‘Declipper.’ Cross your fingers and select ‘Restore Heavily Clipped.’ Hopefully, your audio will have been improved!
- Markers: These are signposted next to the Effects Rack, and are essentially notes you can pepper throughout your project timeline. They’re perfect for remembering edit/delete points within a track – add them by hitting the ‘M’ key.
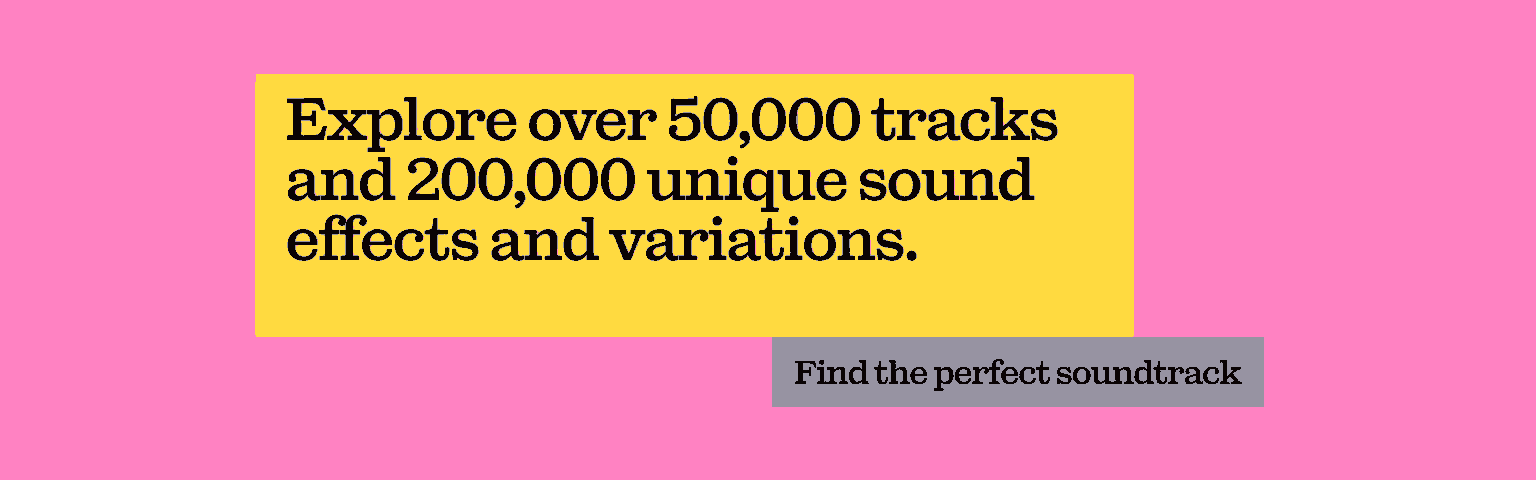
How to get the best Adobe Audition sound effects
Adobe Audition comes with a bunch of sound effects for you to play with, but if you want to dig deeper, why not try Epidemic Sound? We’ve got more than 200,000 unique sound effects and variations for you to use in your project. Check out our catalog below.
How do I export audio in Adobe Audition?
To mix everything down and share it as an audio file, head to the ‘Multitrack’ menu, then ‘Mixdown Session to New File’ and ‘Entire Session.’ Once you’ve clicked that, your Multitrack session will be saved into Waveform view.
Next, click ‘File’ and ‘Save As.’ Name it, choose the location and all that jazz – we’d recommend saving it as a WAV file, as these are higher quality than MP3s.
Is Adobe Audition like Audacity?
This question gets asked a lot: Audacity is an open-source, free-to-use DAW, so people naturally want to know why they should shell out for something else.
Audacity vs. Adobe Audition
- Price: Audacity is free. Audition is not, and a Creative Cloud membership sets you back $20.99 per month.
- Appearance: Audacity seems more basic, whereas Audition’s layout looks like it should cost money.
- Ease of use: Both programs are pretty easy for beginners, but Audacity makes it simpler to find and select your audio input and output.
- Multitracking: It’s possible to record multiple tracks in Audacity, but it takes longer. It’s more fiddly. Adobe Audition allows you to simultaneously record Multitrack from different microphones, which can save a bunch of time.
- Editing & mixing: Audition wins outright here. Audacity offers effects and editing options, but it’s much more primitive and destructive. Audition’s non-destructive Multitrack workspace makes things easier for beginners to learn by making mistakes.
What are the disadvantages of Adobe Audition?
Adobe Audition is an incredible tool, but it’s not perfect. Here are a couple of disadvantages when it comes to using the program.
- It lacks MIDI support. This makes it difficult to record music directly into the program – Audition’s setup assumes the music is already recorded, and you’ll just be mixing or editing.
- It’s quite pricey. As mentioned before, Audition is only available as part of the Creative Cloud package. That’s $20.99 per month, so unless you’re using it regularly, the cost is high – especially compared to a free program like Audacity.
While there are some small disadvantages, it’s not enough to put beginners off. Audition is easy to learn, endlessly customizable, and worth the money.
So, there you have it. Those are the basics of using Adobe Audition. With these tips, tricks and facts under your belt, we’re sure you’ll be able to edit some great audio content in no time.
We’ve covered a lot in this Adobe Audition tutorial for beginners, but we’ve left one thing out: music. If you need to find a ready-made, tried-and-tested banger for your podcast, radio show, or something else entirely, we’ve got you covered.

Related posts: